
Colloidal silver is an entirely natural, liquid, broad-spectrum infection-fighting agent found in almost every health food store in America. It is made using a simple electromagnetic procedure that extracts microscopic silver particles from a more significant piece of pure silver immersed in water. The electric charge on each atom in the resultant solution keeps these minute silver particles suspended. The electric charge on each atom held the tiny silver particles in suspension in the resulting solution. When taken, they enter the body like any other mineral before being eliminated naturally.
While there are commercial brands of colloidal silver, many people do not realize it’s possible to make top-quality colloidal silver in the comfort of their homes. That said, how do you make colloidal silver? Keep reading if you’re considering making colloidal silver.
Colloidal silver is made using colloidal silver generators. They allow you to make all of the high-quality colloidal silver you want, quickly and easily, in the comfort of your home. And you are free to continue doing so forever.
Background of Colloidal Silver
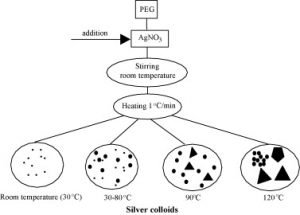
Colloidal silver is created via electrolysis of distilled water using two electrodes, one of which must be made of silver. The purity of the silver electrode determines the quality of colloidal silver, among other factors. As a result, 99.99 percent pure silver electrodes should be used.
Method: Using the colloidal silver generating function of the unleash health blood electrification & colloidal silver generating unit. The unit has the choice and capacity to produce a colloidal silver solution in addition to carrying out Blood Electrification therapy when using the correct procedure.
Setup
The additional resources you will need to generate colloidal silver properly are as follows:
- Distilled or reverse-osmosis-treated water.
- A 10- to 30-ounce glass jar with a tight-fitting plastic top. Plastic containers are not advisable due to plastic/PCB leeching in the final product.
- A household cup warmer will heat the solution during the process for optimal convection currents and minimize metallic silver from being deposited in the solution.
[products ]
The followings are optional:
- A Total Dissolved Solids (TDS) Meter reads liquid content in PPM. (optional)
- A pH Meter to test the alkalinity and acidity of your solution. (optional)
- A timer/ or adjustable alarm clock (optional)
- A thermometer (optional)
Preparing To Make Colloidal Silver
Note: You must keep all interacting items, surfaces, and containers as least contaminated as possible. Use only distilled water to rinse and clean the silver rods before and after each process, all containers, the operator’s hands, and the surfaces with which these items may come in contact. Do not handle organic or metallic materials like distilled water, silver rods, or equipment. Using sterile and protective latex or plastic gloves may be beneficial.
Preliminary steps
Once you have gathered the necessary and optional tools, a few preliminary steps are required in the process.

- Start by placing your cup warmer in an easily-to-reach, stable location. You can connect and turn the warmer on to gather some heat on the surface.
- To accommodate the silver rods, it is best advised to drill two small holes about 1″ to 1.5″ apart in the center of the jar’s lid. Alternatively, you can bend the silver wires over the jar’s rim, so they are equally spaced apart.
- Place the unit near the jar. For maximum performance, make sure you have a brand-new set of batteries inserted for this purpose.
- Place the application electrodes into the Colloid input jack with the unit turned off.
- Extend the electrodes using the alligator clip extensions included by plugging the electrode probes into the clips’ connectors.
- After that, fill your container as high as possible to make as much contact with the silver rods’ surface area.
- Place the prepared lid on top of the jar.
[products ]
- Insert one silver rod at a time to its maximum depth into each hole in the lid; secure the position with either of the two clips. Although orientation is unimportant, it’s a good idea to occasionally switch the silver rods to lengthen their lifespan before too much material is lost, preventing reusability.
- The unit can now be switched on and left on. If necessary, the indicator bulb can be used to ensure that the colloidal silver circuit works by touching one of the silver rods to the other. When the unit is in use, they are safe to touch. Discontinue this after 30 seconds, as the lamp will become very hot and may melt or burn out the surrounding plastic socket holding it in the panel.
- The conductivity of the water affects the bulb’s brightness. It is an unnecessary problem if the light is weak or even stays dark while the process is ongoing.
- Remove the alligator clips when done. To get rid of the dark oxide on the anode, clean the silver electrode wire after each use. The rod clipped with the red-colored electrode probe determines the positive electrode in the configuration.
- Use a small piece of scouring pad to clean dried silver. Then wipe it with a paper napkin to prepare it for subsequent use.
- Make sure you use pure (.9999 purity) silver rods to create safe colloidal silver. Also, contrary to some instructions, there is NO need to add any type of saline components such as salt or sea salt, this will cause the formation of silver compounds that are not safe to consume.
Many factors affect the size of the particles. The main factors to consider include temperature and solution circulation during the process. They are both controlled by the use of a cup warmer and sterility. These factors are best achieved when adhering to the above processing outline.
It is advised to filter through a few non-chlorinated coffee filters for the best filtration before storage or usage if visible particles of what has fallen off the generating silver electrodes are found after a batch of colloidal silver has been completed.
Storage Option
The best storage options for colloidal silver are opaque, non-conductive containers made of amber or cobalt glass. Avoid light since even ambient light will quickly destroy colloids, rendering the solution gray or black. Be sure to shake thoroughly or stir each time before use.
Final Thought
Not all colloidal silver generators are the same. There are high-quality units, and there are some real stinkers out there. While just about any colloidal silver generator will allow you to enjoy the dramatic benefits of Naturistics colloidal silver, not every generator is specifically designed to maximize each of them. Make sure you adequately research a colloidal silver generator before making a purchase. To create an electrical current that enables the silver particles to trickle slowly and gently off the silver electrodes over several hours rather than being blasted off the electrodes in larger chunks over a shorter period, look for one that properly balances the voltage against the amperage during the colloidal silver-making process.